Two-Factor Authentication เป็นกระบวนการรักษาความปลอดภัยที่ผู้ใช้ต้องยืนยันตนในอีกรูปแบบหนึ่ง โดยปกติใช้เพียง username และ password เท่านั้น ก็สามารถเข้าใช้งานได้ ซึ่งวิธีนี้ง่ายต่อการคาดเดาเมื่อมีใครบางคนพยายามจะเข้าถึงบัญชี จึงมีการยืนยันตัวตนในขั้นที่ 2 หรือ 2FA นอกจาก username และ password แล้วยังต้องใช้รหัส OTP ที่ได้จากแอพพลิเคชั่น โดยเป็นตัวเลข 6 หลักที่ถูกสุ่มขึ้นและยังถูกเปลี่ยนตัวเลขไปเรื่อยๆ จึงยากที่จะคาดเดาได้ถูกต้อง เพื่อนำมายืนยันตัวตนเข้าใช้งานอีกครั้งหนึ่ง
สิ่งที่จะต้องมีในการติดตั้ง 2FA บน Google Authenticator มีดังนี้
- ระบบปฏิบัติการบน Linux CentOS 7
- โทรศัพท์ที่มีระบบปฏิบัติการ Android หรือ iOS
- แอพพลิเคชั่น Google Authenticator
ขั้นตอนที่ 1 – Login ในฐานะผู้ใช้งาน root และทำการอัพเดตระบบต่างๆให้เป็นปัจจุบัน
# ssh [IP]
# yum -y update
ขั้นตอนที่ 2 – ติดตั้งแพคเกจที่จำเป็นในการติดตั้ง google-authenticator
# yum install https://dl.fedoraproject.org/pub/epel/epel-release-latest-7.noarch.rpm
# yum install epel-release
ขั้นตอนที่ 3 – ติดตั้ง google-authenticator
# yum install google-authenticator
# rpm -qi google-authenticator

ขั้นตอนที่ 4 – สร้าง user ให้มีสิทธ์เทียบเท่า root
# useradd [newuser] -G wheel
# passwd [newuser]
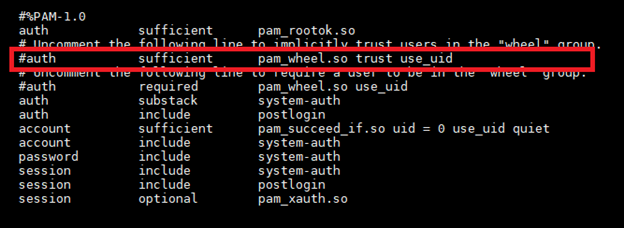
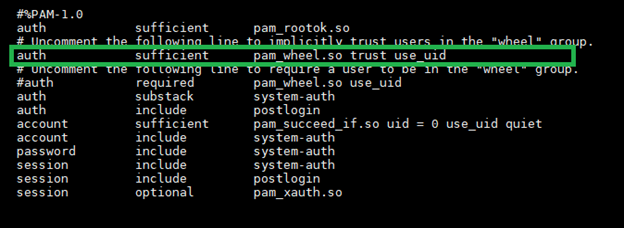
# vi /etc/pam.d/su
ทำการแก้ไขนำ # ออกจากบรรทัดต่อไปนี้
ขั้นตอนที่ 5 – ทำการสร้าง Token และ QR code เพื่อใช้บนแอพพลิเคชั่น
# su – [newuser]
# google-authenticator
จากนั้นทำการตอบ Y ด้วยกัน 5 ครั้ง ดังตัวอย่างข้างล่าง
Do you want authentication tokens to be time-based (y/n) Y
Warning: pasting the following URL into your browser exposes the OTP secret to Google:
https://www.google.com/chart?chs=200×200&chld=M|0&cht=qr&chl=otpauth://totp/root@authentication%XXXXXXXXXXXXXXXXXXXXXXXXXXXXXXX
Your new secret key is: ZE7IK7KDXXXXXXXXXXXXXXXX
Your verification code is 69XXXX
Your emergency scratch codes are:
769XXXX
315XXXX
569XXXX
253XXXX
782XXXX
Do you want me to update your “/root/.google_authenticator” file? (y/n) Y
Do you want to disallow multiple uses of the same authentication
token? This restricts you to one login about every 30s, but it increases
your chances to notice or even prevent man-in-the-middle attacks (y/n) Y
By default, a new token is generated every 30 seconds by the mobile app.
In order to compensate for possible time-skew between the client and the server,
we allow an extra token before and after the current time. This allows for a
time skew of up to 30 seconds between authentication server and client. If you
experience problems with poor time synchronization, you can increase the window
from its default size of 3 permitted codes (one previous code, the current
code, the next code) to 17 permitted codes (the 8 previous codes, the current
code, and the 8 next codes). This will permit for a time skew of up to 4 minutes
between client and server.
Do you want to do so? (y/n) Y
If the computer that you are logging into isn’t hardened against brute-force
login attempts, you can enable rate-limiting for the authentication module.
By default, this limits attackers to no more than 3 login attempts every 30s.
Do you want to enable rate-limiting? (y/n) Y
ขั้นตอนที่ 6 – ทำการ config เปิดใช้งาน Google Authenticator
# vi /etc/pam.d/sshd
ทำการเพิ่มข้อความต่อไปนี้ลงไปบรรทัดสุดท้าย

# vi /etc/ssh/sshd_config
ทำการแก้ไขข้อความต่อไปนี้


# systemctl restart sshd
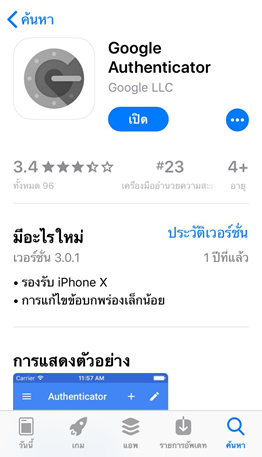
ขั้นตอนที่ 7 – Download แอพพลิเคชั่น Google Authenticator
ขั้นตอนที่ 8 – เปิดใช้งาน QR code บนแอพพลิเคชั่น Google Authenticator
8.1 ทำการกด new เลือกเป็นในส่วนของ สแกนบาร์โค้ด
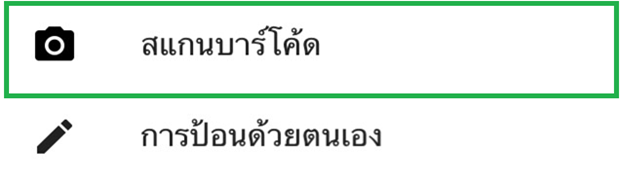
8.2 จากนั้นดำเนินสแกนบาร์โค้ดที่ได้รับจาก URL ในขั้นตอนที่ 5

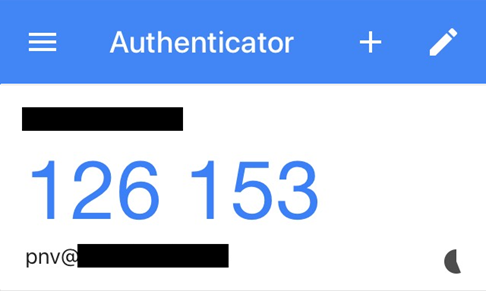
8.3 หลักจากทำการสแกนบาร์โค้ดเรียบร้อยหน้าต่างแอพพลิเคชั่นจะปรากฏชื่อ Hostname, รหัส OTP และชื่อ user สำหรับ login เข้าใช้งาน SSH
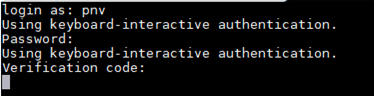
ขั้นตอนที่ 9 – ทดสอบเข้าใช้งาน
- ทำการเปิด terminal ด้วย session ใหม่
- ทำการ SSH เข้าเครื่อง server
- ทำการกรอก user ที่ได้ทำการสร้างไว้
- กรอก password ของ user ดังกล่าว
- กรอก verification code โดยดูรหัส 6 หลักได้จากแอพพลิเคชั่น(โดยไม่ต้องเว้นวรรค) Google Authenticator
***หมายเหตุ***
หากกรอก verification code แล้วและไม่สามารถสามารถเข้าใช้งานได้ให้กลับมายัง terminal ที่เปิดค้างไว้และดำเนินการ google-authenticator ให้กับ user ใหม่อีกครั้ง
HostPacific หวังเป็นอย่างยิ่งว่าผู้ใช้งานทุกท่านที่ได้อ่านบทความนี้ จะนำ 2FA นี้ไปติดตั้งและใช้งานบน Server เพื่อเพิ่มความปลอดภัยในการ SSH เข้า Server จากผู้ไม่ประสงค์ดีที่สามารถสุ่มเดา username/password ของท่านได้ ซึ่ง 2FA เป็นอีกทางเลือกหนึ่งสำหรับยืนยันตัวตนว่าคุณคือตัวจริงที่สามารถ SSH เข้า Server และจัดการกับข้อมูลต่างๆภายในนั้นได้


